What if I told you that there was a Raspberry Pi board that you could actually buy right now with Wi-Fi? It’s true. The Raspberry Pi Pico W is here to fill the void and give you some great options as a maker to make anything you want. How about you want to make a CheerLights display?
MicroPython
To make the Raspberry Pi Pico W do something, you need to give it some instructions. One way to do it is to use MicroPython. MicroPython is an efficient subset of the Python 3 programming language tailored for microcontrollers like the Raspberry Pi Pico W.
Install Thonny

Now, we need to do some configuration. Click on View and enable Files.

Additionally, we need to tell Thonny that we will be controlling the Raspberry Pi Pico W. Click Tools and then Options. Select the Interpreter tab and select MicroPython (Rasberry Pi Pico).

Now, plug in the Raspberry Pi Pico W to your computer while holding the BOOTSEL button.

Find your Raspberry Pi Pico W in your folder explorer and copy over the appropriate UF2 file. The appropriate file is determined if the Pico is standalone or hooked up to something like the Galactic Unicorn from Pimoroni. The Pico will reboot.

If everything goes well, Thonny should show you that it is connected to the Raspberry Pi Pico W.

Wi-Fi
We have MicoPython running on the device. We have Thonny running on our PC. We are ready for the fun stuff. All of the fun stuff is on the internet so we need to connect our Raspberry Pi Pico W to Wi-Fi. The Pico requires a 2.4Ghz connection.
Add a new file to the Pico called, “WIFI_CONFIG.py”.
Enter this code in the new file and click save. This will create a new file on your Pico that contains your Wi-Fi credentials and shared among your projects that need to connect to the internet.
SSID = "change"
PSK = "change"
COUNTRY = "US"
In the same way that you created the Wi-Fi config file, create a new file called, “network_manager.py” with this code, and click Save.

Okay… we have done a lot of configuration at this point, so let’s test the Wi-Fi connection. I created a quick “network_test.py” script to set up a Wi-Fi connection based on your Wi-Fi settings. Once connected, the script tries to read data from the ThingSpeak CheerLights channel. If the test is successful, you should see a local IP address and the latest CheerLights HEX color code.

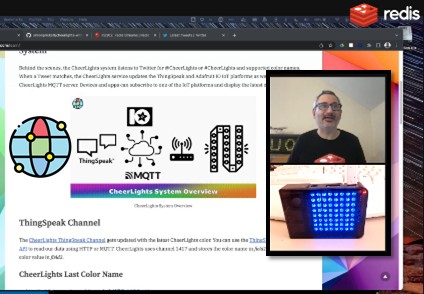
CheerLights
So, the idea behind CheerLights is to keep a global network of multicolored lights in sync with each other. Anyone at any time can set the color and all of the connected lights on CheerLights set their color to match. To set the color of the CheerLights network, you can tweet to @CheerLights to mention a color name or use our Discord server CheerLights bot.
To build a CheerLights display, you need a device to get the latest color from CheerLights or from an IoT platform like ThingSpeak or ADafruit IO, parse the data, and set itself to that color. If your network settings are working, you are in good shape to get your display working.
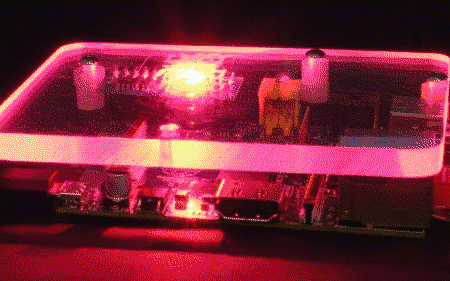
I recommend using a Raspberry Pi Pico W board connected to the Galactic Unicorn from Pimoroni. It is a wonderful display of 500+ LEDs, a speaker, and a Raspberry Pi Pico W bolted right on the back.

The brains of the Galactic Unicorn from Pimoroni is the Raspberry Pi Pico W board. The Pico is what connects to the Wi-Fi and controls the pixels on the display. I spent some time making a straightforward script to get the color and light up the display. I munged code from Hel Gibbons. Thanks for the inspiration. I am still working on new examples and stability. Follow my code updates on GitHub and check in on our Discord server.